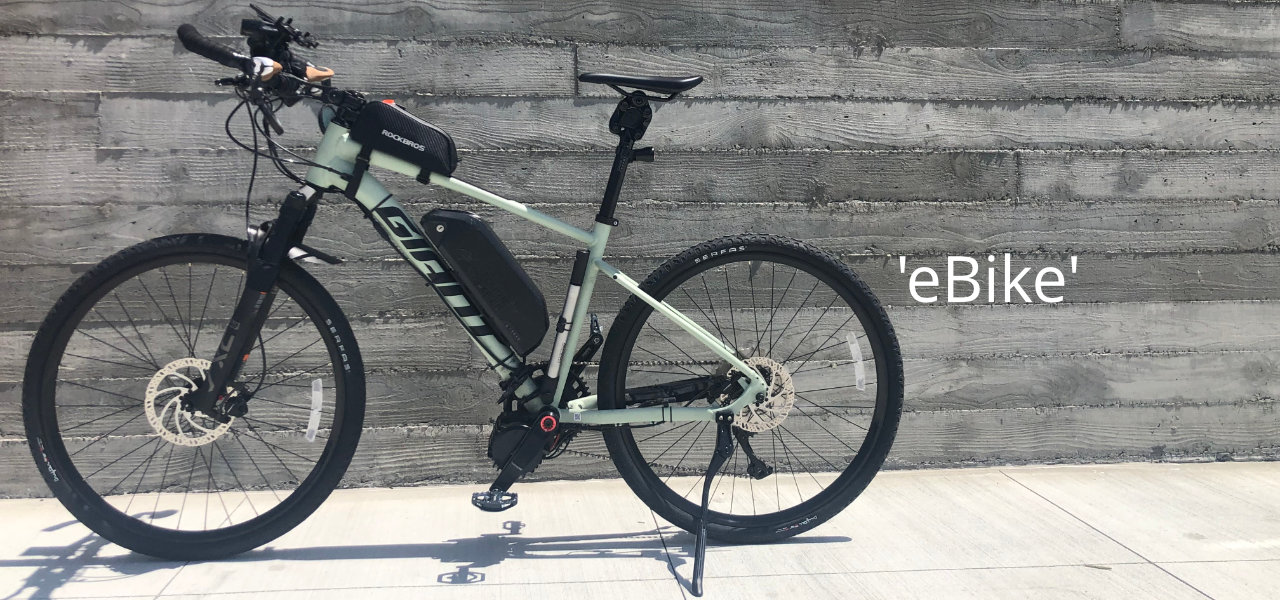
Summary
To learn more about e-bike builds and how to's and what might be needed, check out JohnnyNerdout.com
Modifications
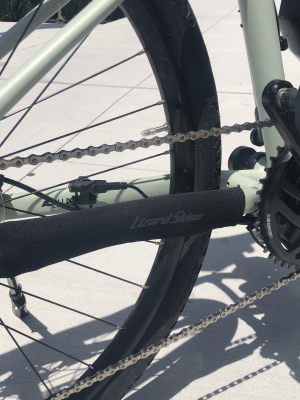
To keep things pretty back there. Removable (fastens with velcro), washable, practical,...etc.Bought on Amazon.
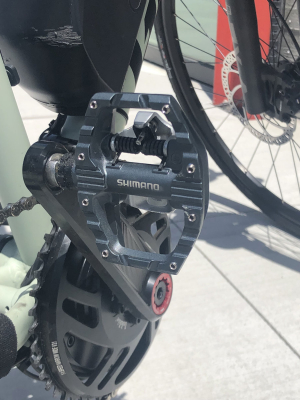
The pedals the Giant comes with are really cheap. I wanted pedals which could accommodate my Shimano cleats and also let me ride in regular shoes around town. These things are great. Have them on my Fuji Cross hybrid too. Bought on Amazon. Yeuch! Ugly scratch on my battery case. Hit a pothole and it flew off the bike coming down a hill doing about 30mph. Made a heck of a crash as it landed. My fault - had not locked the battery to the bike! All good save the ugly blemish.
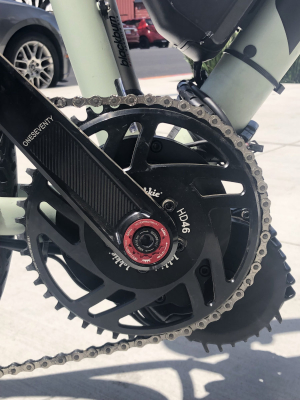
Called a "bling ring" and available on the various Electric bicycle websites. I bought mine as part of my kit from ElectrifyBike.com. Mine is a 46 tooth chainwheel. Every second tooth is the same size...there being two sizes, one narrow and one fat. Helps grab the chain better for when one is in lower gears and pushing hard up hill - prevents the chain from coming off.
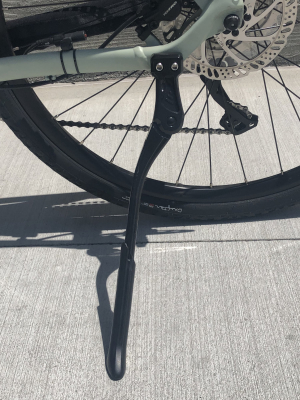
Giant make a stand for this bike but it's about twice the price of this one and no better so it was a simple decision. < a href="BV Adjustable Rear Mount Bicycle Bike Kickstand" target="_blank">Bought on Amazon.
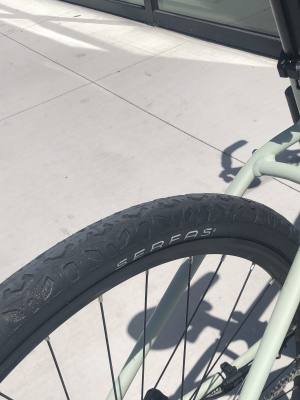
The Giant Talon1 came with 2.5" Maxxis tires. If Mountain biking on trails is your thing, they'd be great. My thing was mostly city streets so I wanted a road tire which could standup to some crap roads and one which was more narrow and as such, made less noise and had less friction with the road. Enter the Serfas. Great tire. Bought the 1.5" on Amazon.
The Build
Unboxing - Part 1 of 25
Unboxing all the goodies purchased. This includes a quick look at the 17 Amp hour Battery pack from Electrifybike.com, the 1000W mid drive Bafang motor, some tools, a Lekkie bling ring (chain wheel) and crankset, cables and what would turn out to be a front light ....which comes with the kit. By the way, I think the battery is called a Jumbo Shark.
Preliminary Fit Estimations - Part 2 of 25
A preliminary battery fitting and then a look at the hugely wide handlebars the 2021 Giant Talon 1 came with. Time to contemplate chopping them down a bit. If you plan to use the bike for mountain biking they are likely a good size butI plan to use the bike for commuting in a city with only occasional mountain bike pursuits so making them more narrow and utilizing the bull horn extender bar ends is more in line with how I'll use the bike.
Gauging where to place the E-bike controls - Part 3 of 25
This was all new to me so trying to figure out where to place the E-bike control unit. It's a simple device with two rubber push buttons and a '+' and '-' button. The two buttons were for Power and Mode (range, speed, time, distance, trip,...etc) selection. I would soon discover, that it enables one to navigate through the E-bike's configuration settings as displayed on the little LCD panel that it would sit next to.
Handlebar width and where to place things - Part 4 of 25
Gauging how much to cut the handlebars down to in order to fit the thumb throttle and control unit spoken of in previous video. Out with pipe cutter and get cuttin'!
After the handlebar cutting incident - Part 5 of 25
This is what I ended up with after using the pipe cutter on the handlebars. It slid around a little owing to my novice experience with it. I had used it before on another bike but whatever coating they used to paint the handlebars with meant they were quite slippery so as I tightened the rollers with each turn the blade deviated ever so slightly from my intended cut line ....but I'd only find this out after the fact. Didn't matter in the end, as it would prove a perfect fit for me. So, the bars ended up being cut down to about 24" in total width. Then I put everything on to see how it all fit together in terms of ergonomics. With the handlebar grips, bar end extenders and mirrors, the final width was somewhere between 25 and 26" which is fine for my bodily size. Future aspirations of what I hoped to tackle next are also discussed along with some info on the battery.
Remove Bottom bracket - Part 6 of 25
Nothing too interesting here. Just using a bottom bracket removal tool to get the old one off in preparation for insertion of the Bafang kit replacement which comes attached to the motor. Taking the bracket off on the right hand side would prove a real challenge. I didn't video it but I had to use a clamp to hold the bracket removal tool on because without it I couldn't turn the wrench. The issue was the right side bottom bracket was on super tight so I needed to crank the tool with a huge torque wrench and when I applied the pressure the tool would lose its grip. If I find the photo or video of this minor crisis I'll add it later.
Fitting the Brake sensors - Part 7 of 25
A big part of getting this all working was appreciation of how its supposed to work. There were no instructions or atleast none which explained anything to an ordinary human being such as myself. Through trial and error I'd get there but there was quite a bit of time spent figuring out how and why it did not work. It's worth noting here for those of us who aren't familiar with this setup how it works. The kit comes with spot magnets. The magnetic field they generate is how the motor knows to work. By this I mean once they are in play (your brakes are not on/applied) then the motor will happily assist you. As soon as you pull a brake lever the magnetic field flux lines are far enough away from the sensor for it to say, rider must be braking so I am going to turn off the motor. This is the really simple but important facet of how this all works to grasp. It took me a while to figure it out without the missing manual.
Gluing the magnet next to the sensor - Part 8 of 25
In this video I glue one of the spot magnets onto the brake lever so that it can provide the flux line sensor with the info it needs to cut the motor when the rider applies the brake. It's imperative that the spot magnet is glued properly and in the right location for this to work but also in such away that it does not fall off. Add to that, it's vital that th epoxy does not glue the brake lever permanently or we'd have a whole slew of new problems in having this thing behave like a functional bicycle.
Testing the Fit - Part 9 of 25
Things never go smoothly when you don't have a tripod. In this video I wrestle with the iphone and trying to test fit the work I just did. I don't think anyone will be hiring me as a camera man.
Testing - Part 10 of 25
After some cursing I tested the fitting. Thankfully everything worked as needed. Also discussed what's coming up next and in particular the fitting of a nylon replacement cog inside the motor because it makes the motor run quieter and it is reputedly stronger than the cog shipped with the Bafang motor. Before I do anything like this I always try to read up on what if any are the possible failure modes associated with equipment I am about to buy. This practice stems from owing motor bikes over the years and trying to steer myself clear of incurring unnecessary costs down the road.
DC Motor Disassembly - Part 11 of 25
Reviewing the disassembly of the DC motor and what I will endeavor to achieve in the next few videos.
Extracting the OEM cog - Part 12 of 25
In this video I set about removing the cog that came with the Bafang motor in preparation for its replacement with the new one I purchased based on what I read in various forums about making the motor more silent and having the cog itself last longer.
New Cog Installed - Part 13 of 25
Showing the new cog in place and the grease all the forums recommend. Then, a quick overview of the drive mechanism sequence.
Gasket quandaries - Part 14 of 25
Gaskets and supply chain issues start to hold me up. It's the midst of Covid. There are supply chain issues globally and I have to wait for certain 'bits and bobs'. Also shown, cleaning the old OEM grease out and replacing it with the red Mobil 1 synthetic grease.
More Gasket issues - Part 15 of 25
Still waiting for the stator gasket and another gasket missing in action. Getting ready to clean away more OEM black grease from the main internal drive wheel of the motor.
Cleaning the OEM grease out - Part 16 of 25
Discovery and removal of the OEM grease and oil. I dunno what they put in their motor and I'm sure they had good reason...or I hope they did but I decided to take it all out. It looked like low grade stuff at any rate.
Leaving well enough alone - Part 17 of 25
The cleaned motor and the missing gasket.
Applying the Mobil 1 Grease - Part 18 of 25
Slathering on some of the red Mobil 1 synthetic aeronautical grease to replace the crappy OEM black sludge I removed previously.
Gasket Arrives - Part 19 of 25
Getting ready to install the new gasket and doing so in a slightly different manner to most other Bafang e-biking YouTubers.
Gasket Installation technique - Part 20 of 25
How to install the gasket. Everyone on YouTube does it one way so, ......of course - I'll do it differently! Wish me luck!
It's working - Part 21 of 25
Pulling a perfectly good Bafang DC motor apart just because you can was not a great idea but it worked out in the end and proved cathartic for me as I went through some stress filled life events.
Recap - Part 22 of 25
In this video I review what I've done and discuss previous tests and failures (Error 21h - speed sensor error) and what's going to happen next. Also a quick homage to my 1980's Team Raleigh trainer.
Cable Management and Testing - Part 23 of 25
Routing the cables and trial fitting everything.
Gear Adjustment - Part 24 of 25
Captain Killjoy and the Bringdowns visited me today. I thought I was home and clear but the whole project is going to require a longer chain owing to the larger (46 teeth) Lekkie chain ring.
Review - Part 25 of 25
This is nearly all she wrote. Between buying the bike and all the ad-ons spoken of in this video and then buying the ebike kit and various replacement parts the whole build took about 3 months owing to various supply chain issues and delays due in large part to the Covid crisis which was in play a the time. Overall, it has been a huge success although after this video I did need to adjust the gears again.